Wednesday, November 30, 2016

Nine Antique Holiday Gift Ideas That Are Way Better Than Whatever You Were About to Buy on Amazon


Tis the season ladies and gentlemen. We have to cover our houses with tacky decorations, scroll past every single one of our friend's 'Elf on the Shelf' Facebook posts, and we need to give each other thoughtful gifts to prove our affections.
       So you can be basic and buy your stuff at Target or on Amazon, or you can be a gift giving genius and give beautifully unique, one of a kind antique objects that are sure to make your gift-target swoon with amazement and delight. I know the idea of antiquing seems daunting, but you can do it from the comfort of your favorite squashy chair just by sifting through ebay or etsy, or online auction catalogs *or* you can go spend a delightful day out perusing your local thrift shops and antiques stores. I can wholly guarantee that either option will be far more holly jolly than trudging through an overcrowded shopping mall.

        Antique and vintage objects are far more personal and possess far more soul than any mass produced object you're gonna snag off the rack at Old Navy, or Nordstroms, and often they're far more budget friendly as well. Here are some of my favorite antique-y gift ideas. I have given every single one of these as a gift in the past, cause I'm awesome like that, and now you can be too.

1. Candlesticks
       Literally the only person for whom this is not an appropriate gift is your college attending cousin, who isn't allowed fire in her dorm. Everyone else likes fire; we're all pyros at heart, now's the time to elegantly say, "Here, now you can have classy fire, right at your dining table!". Candlesticks range in price. I've never been to the goodwill and not seen at least three sets, usually for under $5, often handsome mid 20th century brass or cut glass ones. Or you can shop antique stores or online for fancier versions. They come in all shapes and sizes so it's quite easy to pick a pair for your uptown modern sophisticated friend, and your friend who lives in a converted barn and lusts for the rustic. Up the ante by including a couple pairs of nice beeswax tapers in the package.
via

via

I especially adore this pair!
via
2. Lithographs, Prints, Maps and more
              This is a TOP SHELF gift that costs soooooo little. Printed goods, ephemera, and maps are an outstanding and gorgeous gifty option. When I shop for a print to give as a gift I think about my target, what do they like? Do they have a hobby like golf, gardening, cooking, or crafting. Whatever that interest is, just climb up to that 'Ebay' search bar, and enter that interest "horses antique print" and you'll have mountains of options. Or maybe your friend has zero hobbies, but do they have a favorite vacation destination? Then enter "Florence antique map", or perhaps they love farmhouse decor, there's loads of fun 19th century prints of animals that look incredibly sharp when framed.


Here's a set of late 19th century prints that were originally book illustrations.
How divine would they look framed and hung together!
via via via 


For your New Yorker friend (we've all got one) here's a wonderful 1861 print of Central Park!
via 

OR for the Fashionista, how bout an incredible set of original 1950s fashion prints from major fashion houses like Dior and Balenciaga.
via 
3. Silk Scarves
           Another category where you can get big impact for little investment. Silk scarves have been popular accessories for more than two centuries, though they really hit their stride in the second quarter of the 20th century. Because they're small, sweet, and easy to store, millions of them survive today in perfect condition. Since millions of them survive, they're quite affordable. As with prints, you can easily use a search term online to find a specific and personalized scarf, or visit a clothing consignment or thrift shop, where there's often cascading mountains of them, and put together a stunning color spectrum group of six or a dozen.

via

via

via


4. Signs
           Probably my personal favorite thing to collect, antique signs are handsome and intriguing and suit all decor from an urban industrial loft to a quaint cottage kitchen. Many are quite delightful and cheeky too! I found both these signs in about thirty seconds of searching ebay- under the "architectural and garden" category of the antiques tab. Auctions such as Garth's, Skinners, Cowan's, and Pook and Pook also have loads and loads of amazing authentic antique signage.

perfect for a man-cave.
via

I mean, come on, this is to die for!!
via
5. Jewelry
      I hardly ever wear jewelry, but when I do, you're damn right it's antique stuff I bought for a song. It boggles the mind that anyone buys new jewelry when there's so many spectacular options to be found at every single antique store in the country. You can either purchase something elegant and refined, or give a funky set of costume baubles in crazy colors! For the dapper man there's an incredible array of antique cufflinks to be had.

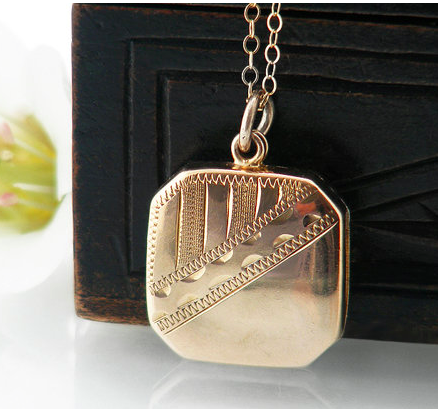
I LOVE this early 20th century Art Deco gold locket it, BE STILL MY HEART
This is what I want for Christmas!
via

Take no prisoners drop dead gorgeous
via

Sophisticated and delicate and perfect for the office or a night out
via

Antique cufflinks to add a bit of character to any gentleman's suit game
via
6. Mixing Bowls
          For a cozy, homey hostess gift, why not an antique mixing bowl! They come in all shapes, sizes, and colors to suit any kitchen, and are chunky, durable, functional, and endearing. Take the gift to the next level by filling it with yummy treats, or a cookie mix kit!

Deep blue add a healthy dash of color to any kitchen
via

The perfect popcorn bowl EVER!
via

Just picture this stunning pair on a shelf in a farmhouse kitchen!
via 

7. Bookends
             The perfect gift for the bibliophile in your life, vintage and antique bookends usually cost $50 and under, are small, easy to ship, and will last a lifetime. There's bookends to meet every taste from reclining nudes to busts of Abraham Lincoln. They're simple to find at antique shops, thrift stores, and of course on ebay and etsy.

This solid brass Art Deco option is collapsible! How clever is that!
Would be great in a kitchen to hold cookbooks.
via

I have a dear friend who has a Scottie, I bet she'd love these.
via

For the Harry Potter fan, the bird lover, or anyone who (rightly) thinks owls are super cool
via
8. Boxes
          There's a never-ending supply of nifty storage vessels out there in the world of antiques. I personally love a beautiful antique wood document box, but there's also tea caddies, trunks, tool chests, and sweet little sliding lid boxes. Everyone has something that would be better off cunningly stored away in a wonderful antique box. Perfect for recipes or playing cards, collections of wee small interesting things, or jewelry.
19th century walnut document box. I'm reeaaaaally thinking about bidding on this one for myself.
Love the taped in mirror.
via

Known as a "tantalus" this is the 19th century version of a mini bar, meant to hold bottles of booze and other drink-y accessories. Would be great with several bottles of fine liquor, or could make the perfect desk top accessory organizer
via

The stenciled numbers make it for me, SO CUTE.
via 
9. Decanters
       And while we're on the topic of holiday "spirits" what's an easier gift than a stunning antique decanter! Fill it with booze, or package it up with a bottle of your giftee's drink of choice, or just leave it as is. Most thrift shops will have multiple options, many of which cost a small fortune when new and are now are $10 or under. Just a couple months ago I scored a flawless Bacarat crystal decanter at the goodwill for $4! You can also armchair shop from a pool of thousands on etsy and ebay.
The absurdly elongated stopper on this Georgian option is fabulous
via

The perfect pair!
via

And some wonderful silver detailing on this early 20th century option!
via


Tuesday, November 29, 2016

How to Paint Furniture

Well, here it is. I've made you wait a long long time for it, a couple of months if I'm recalling correctly, but here's my step by step guide to painting furniture.

        Before you begin any prep work, the first step to painting furniture is to decide if you even *should* paint said piece of furniture. People can get pretty hotheaded about slapping paint on a piece of mahogany, which is both hilarious and sad, so don't let the wood preservation brigade bully you out of reinventing a piece if you're sick of it. 99% of the furniture on the market is perfectly fine to paint or refinish. It's either not that old (I try not to refinish anything dating to before 1850), not that rare (I mean, if you're painting a George Nakashima table or a Roycroft desk you're an ass), or not in good enough condition to be of any value other than what you could squeeze out of it with a cunning upcycle. For an entire treatise on my stance on painting furniture- click on over to this blog post I wrote about a year ago. Also- in this post I'll only be talking about painting techniques. If you want to learn how to refinish a wood top, check out my how-to blog post on that here!


          Quick and dirty, here are my general rules for when to paint and when not to paint:

1. Is the piece in perfect condition?
-If it is I tend to demur unless it's custom for a client. There's plenty of busted beauties out there that are more worthy and more satisfying to save.

2. Was it made before 1850?
-Now, I hear you shouting "How the hell will I be able to tell that?!". I can because I've been working with early antiques for a decade, maybe you can't, but I am a generous soul, at least when it comes to antique furniture. If you want to paint something and you ever feel it may be an early or valuable antique, you are entirely welcome to email me at KateAveryDesign@yahoo.com with pictures and I will tell you if you're committing mortal sin by painting it.

3. Is this a rare or historically important object that is worth more in its current condition?
- Most stuff isn't, but an 18th century bowback Windsor chair in its original worn green paint, for example, certainly is. Never paint what you can sell for more as is.
A c.1930s mahogany highboy I painted last year. It's a mass produced piece of furniture whose value has always, and will always be purely decorative. Perfectly fine to paint.
source
A magnificent cherry highboy made by a master craftsman of the Middletown, CT area around 1765. If you paint this or one like it, I will personally hunt you down and slap you silly.

PREP WORK

          At this point I should mention this is going to be a gloves off write up on painting furniture. I'm in no one's pocket. I have no sponsors, much to my perpetual irritation- so you can trust that this advice is true, real, and hard won from years of work and somewhere around five thousand pieces of furniture that have migrated through my painty paws.

1. Prep matters MUCH, paint matters little- You have to, HAVE TO properly prep your surfaces. I don't care what any of the $45 a quart chalk paint brands tell you, if you want your paint to stick, coat evenly, and look lovely, you gotta fix your surface first. You need to do most repair work first. I have nothing but side eye for anyone who does not repair chips, gouges, or missing veneer. You're painting this piece of furniture, you have an obligation to make it whole and better. For patches and repairs I use either Bondo (for big jobs) or wood putty (for teensy scrapes and nicks).


2. Every single surface is different. You always need to remove goop and grime, and you will need to sand about 82% of surfaces. If it's slick, the paint won't stick. When in doubt, apply a test patch of your paint, maybe about the size of your palm. Let it dry and then see if you can remove it with your fingernail. If you can then you're gonna need to sand that sucker pretty well to get good adhesion.
a 1960s rock maple hutch with slick surface that I've "roughed up" with 80 grit sandpaper to prep for paint
3. If you're swapping out your hardware now is the time you need to fill your old post holes ( I swear by bondo for this task), and sand them flat. Depending on the hardware I'm putting on down the road, I may even drill my new hardware holes. The old holes can help as a guide to ensure your newly drilled ones are nicely spaced.

PAINT ISN'T POTION

Good gravy, the way people ask for my secret paint mixture you'd think I'd brewed up the elixir of life! For the most part, paint is paint is paint. I use latex that I mix some chalk paint additive into. My base entirely depends on what hardware store I've recently visited. I use Valspar and Behr, Clark and Kensington, and Benjamin Moore, usually eggshell or flat- I've not yet decided which finish I prefer more. But in terms of paint manufacturer, I can't tell the difference, and if I can't, you can't either. I've used all the fancy paints on the market, and they're fine, but you only accidentally kick a $45 quart of paint over once before you find yourself a more economical option. I like to mix my own colors, but that's just cause I'm a weirdo. Any one of those manufacturers has about ten million colors from which you can choose.

Some advice on color- Don't agonize over which of thirty different shades of white you might select for your sideboard. They'll all look the same once they're on there. And yellows and lime-y greens will always coat maddeningly thin. Most pieces take 2-3 coats. A white might take four, a yellow can take upwards of 75,000. I love painting furniture yellow, but I swear it's sluicing years of my life.

Here's the tools of the trade:

The chalk paint additive is made of calcium carbonate and something else I can't remember. I buy it by the pound off amazon here. It looks hilariously like suspicious drugs when it arrives. I mix about three healthy tablespoons with an equal part water until it has a soupy consistency, and then stir it into my already mixed paint. I save every possible household vessel I can to use as a paint container- hence the coffee thingy. The paint brush is a $3.99 one from Ace Hardware. It's the only type I'll use. They're magnificent, and I can usually get five to six piece of furniture out of each if I wash them thoroughly between colors. No, I don't use Purdy brushes, they're pretentious. 

Paint like a Pro

             So you've sanded your surface nice and coarse, you've got your paint mixed, now it's time for the fun part. It's very zen to paint. And I'd say there's no right or wrong way to apply paint, except with a sprayer- using a sprayer or a roller is the wrong way AND the lazy way. Paint is meant to be applied with a brush, so that you can see all the wonderful details as you work. Mind not to leave drips as you go, work from the top down. A chalk paint mix dry time is heavily dependent on the humidity level, but is generally 1-4 hours. Never paint in temperatures under 50 degrees (why would you?! brrrrr!). 

Problems You'll Encounter

                 Yesterday I got up having just had the best dream about Eddie Redmayne. The dogs needed to be let out, and I grabbed an almost full mug of last night's hot cocoa to bring down to the sink to wash up. I also decided I should bring my laptop, phone, and a sweater down in the same trip- I'd also been awake for a solid 33 seconds and was generally musing over Eddie's freckles. 
         I tried to open the door, lost hold of EVERYTHING I was attempting to trundle, made the split second decision to save the electronics, and thusly catapulted the mug of cocoa in an elegant eight foot arc that splattered half the bedroom, the hall, the antique dresser by the door, the antique dresser seven feet away (?!), and my startled and affronted border collie (who then took off down the hallway leaving a trail of cocoa splotches behind him). Shards of glass and chocolatey muck were everywhere. I thought I'd gotten it all and then about a half hour ago I was rummaging for my boots in the closet and found the handle of the mug. It was an epic start to the work week.
               Which is to say in an entirely non paint related way, shit happens. You my furniture painting friend, are going to encounter problems on your upcycling journey. Here are some of the most common, and some handy solutions:

1. OH NO the sticky original cherry stain is bleeding through my paint! 
     - Any oil based anything works as an excellent bleed stop. I'll sometimes apply a thin coat of oil based poly to any trouble spots, or a slick of furniture wax, or in a pinch, a bit of spray paint on the bleed to heal it up. Let whatever you apply dry fully fuuuuuullly fully before you apply your next coat of paint. 

2. CRAP- there's all these dings and gouges I couldn't see before, but now with the first coat on they're bashing me in the face with their apparentness! 
      - You can fill holes any ole time during the painting process. In fact, this happens to me so often, I'll often just address the largest issues in my prep stage and then come back with my little container of wood putty after the first coat to fill all the weensy imperfections. Just let it dry, gently sand it off, and carry on!

3. I HATE the color!
        - Well clearly you have decision making issues. I prescribe a glass of wine and a night's sleep before you rethink yourself. Sometimes what looked sickly in 7pm light looks spectacular by the fresh blush of morning. Or if you truly hate it, you can just paint over it. If you're distressing that first shade might peek through at the edges ever so slightly (sometimes I do this intentionally for that very effect!), but odds are excellent you can paint right over dreaded color #1 and it'll be a distant memory by the time you're done.


Finishing

           You're covered with paint, and so, hopefully, is your piece of furniture. Now it's time to finish the job. A chalk paint mixture is very rough and yucky feeling when dry, like a kitten's tongue, or my legs in winter (don't you judge me). To make it satin smooth you need to sand your surface by hand with 220 grit sand paper. 

          Once you've sanded the entire piece down with 220 grit til it's smooth as Eddie Redmayne's British accent, you have a decision to make. To distress or not to distress. I could honestly write an entire book on distressing methods and techniques. Some people like the look, others loathe it. I prefer it on about 90% of the pieces I do. There's the built in benefit that it's a great opportunity to remove any errant and accidental paint drips, and to use the contrast of the original surface to bring out the architecture of the piece. Also, no matter what paint you use, unless you live in a soulless vacuum of a home, painted furniture is rarely entirely infallible, best to distress it now before life does. 

            With distressing, the goal is to mimic natural patterns of age and wear, to make the surface feel one with the furniture, not stark, intrusive, and brand new. Take some time and consider where your current furniture shows its age and use, OR if you bought a fresh house full of ikea last week and have no physical reference point at hand, I always recommend perusing a good online auction house's catalogs. These days you can zoom waaaaaaay up to the pieces to see the detail. Garth's is my personal favorite, they always have the most brilliant 18th and 19th century painted furniture. 

           Here's a wonderful mid 19th century stepback cupboard Garth's sold last weekend. with excellent original wear to its 175 year old surface. Note the dings up the sides from bumps and scuffs, the soft wear on the tops of the door fronts from many many hands opening and closing them, also the wear around the pulls and top lip of the base. Finally, the flat paneled surfaces of the lower doors has the least amount of wear, as they have been only rarely touched in the past two centuries. 

And here's a 20th century pine stepback cupboard I painted this past summer. Note how I've created the same wear patterns along the door, the raised surfaces, the edges, angles, and feet.
 And yea, I'm with you, it's doesn't make my knees nearly as weak as the 19th century mustard one above, but I didn't get $33,000 for it either so...


Finally, here's one I've seen on craigslist for several weeks now. Please please don't do this to furniture, it's bizarre, and not in some post modern apocalyptic exciting way-
source

SEAL IT UP

                The finish line is in sight!! You've either distressed or not, but you've definitely sanded that coarse paint nice and smooth. The final step is to seal your paint so it's washable, durable, and pretty. I always use wax. No one should ever use water based poly, also known as polyacrylic, as it is the most wretched furniture poison on earth. It's a devil to apply, will give you an uneven finish with yellowy streaks, and will discolor overtime. Trust me on this one.

           I always seal my furniture with wax. Hands down the best furniture wax is S.C. Johnson clear paste furniture wax. I'd buy the cute yellow tins by the baker's dozen if I could. You can find them in the cleaning aisle at home depot. It's wonderfully malleable, and thus perfect to work into the surface. I mix mine into a dark wax by chopping the wax up a bit with a paint stirrer, then pouring in minwax dark walnut stain, and then mixing until it's evenly distributed. It's suuuuuper gross and messy and I've not managed to mix up a batch once yet without splattering the stain all over my hands (and once my face!). But my god, it's worth it. It's the best stuff on Earth, that dark wax. It warms the color, creates depth and age, and seals it to all but paranormal and extraterrestrial harassment. 
            When I apply my wax I work in small sections as it dries fast. Rub the wax on, wipe the wax off. It's that easy.
hahaha. gross. 

The top section has been dark waxed, the bottom has not. Look at the difference in depth! 
There's quite a few bits more, but I feel like I've wrung out my painterly soul for this post, so if you have questions feel free to comment below, email me, or find me on one of my social medias!


Sunday, November 27, 2016

A Vintage Hutch in Newt's Blue

I am forever searching for fresh color inspiration, from the patinated green of an antique copper weathervane, to an interesting bit of moss I spot while out hiking with my border collies. It's a nonstop automatic setting in my brain, and when I spot a color I fancy, I have a tendency to obsess a bit about it. I'll find myself staring at the ceiling at three in the morning micro-analyzing just how I might mix the color, and what it would look like in different lighting, and how a dark wax might warm the tone, or 220grit distressing fatigue it.

           Last Tuesday I spotted a color I really took to. Have you seen Fantastic Beasts yet? My god if you haven't, why are you denying yourself such an amusing and energetic treat?! It's a magnificent movie; I've seen it twice now, and spent a good part of both viewings all but drooling over the color of the coat worn by the main character throughout most of the film. This is in no way related to the fact that I am now wholly besotted by the actor, Eddie Redmayne, who wears said coat. Not at all, definitely no connection. Here's a fun little bit about the coat itself from Pottermore-https://www.pottermore.com/news/exclusive-eddie-redmayne-interview-on-newt-scamanders-coat

source  
           
source
           By the end of the movie on Tuesday I'd already made up my mind that first, I would very much like to meet this Mr. Redmayne, and more importantly that I had just the perfect hutch to paint in that wonderful indigo blue. The movie takes place in New York in 1926, this hutch is almost certainly from right around 1925. The character, and his costuming, are a charming natty/tatty hybrid, and this hutch which is almost a hundred years old is a riot of high-style swoops and curves, but has already been painted mint green, and stripped, and refinished badly, and misused and ignored, and generally beat up around the edges. The perfect piece to carry the perfect color.


             So the color itself is a warm blue, which is a bit counter-intuitive at first consideration as blue is fundamentally a cool tone. It's the unique warmth of this hue that makes it so engaging. To create it I started with a blue that was almost cobalt, added several dollops of sea green, a slap of smoky gray, a glop of charcoal gray, and just a smidge of maroon- and then some chalk paint additive, a healthy stir, and whiz bang we've got what I'm calling 'Newt's Blue'.

               In the movie, Newt's vest is a shade of fawn that leans heavily towards mustard, it too is a magnificent shade which I'll surely be pirating for a piece down the road, but it would have been too much for the interior of this hutch. What works on a dapper British actor in a heady magical vintage world oddly doesn't translate quite perfectly to large pieces of mahogany furniture. And so I mixed up a shade of buff that nods towards the complimentary vest without hitting it over the head with the whole mustard hog. I kept the original cast brass drawer pulls but swapped out the underwhelming faux keyhole knobs for bold salvaged vintage brass ones. I added just a bit of gold highlighting to the lot. They don't sparkle but have a sensible warmth and detail which compliments the blue nicely.


Wednesday, November 23, 2016

A Solid Maple Hutch in Black and Gray

Oh Ethan Allen, I do love thee. Actually, while I'm on the topic of things I love- Have you guys all gone and seen 'Fantastic Beasts and Where to Find Them' yet? You really really must. It's my new favorite movie ever. SO GOOD. So much better than any of the Harry Potter movies. And I've now booted Jay Baruchel to the curb, my new man crush is Eddie Redmayne... mmmm magical AND British.
             Now back to business. This hutch is also from the ReStore, one of the best places ever to get furniture! The brother of one of the clients spotted it and approached me to refinish it for him and his wife. I loved their vision for the piece from the word go. It's magnificent, solid maple, by Ethan Allen and just top notch all the way through. The client wanted to paint the case a matte black and do the interior in a platinum shade of pale gray. We opted to swap the dorky vintage pulls out for turned wood knobs that I stained to match the top of the base, which I refinished in a deeper brown- it's just flawless!
               I distressed the case and sealed the exterior in a dark wax and the interior in a clear wax. I think it's about as elegant as a hutch could possibly be now- understated and, as the client put it when I sent him pictures, "that looks sexy!".